Self-Drive Safari in Etosha National Park: 20 Do’s & Don’ts
Vast expanses of savannah, a lone lion crossing the road, and myriads of bird species crowded around waterholes – it doesn’t come as a surprise that Etosha is the number one attraction in Namibia and a prime safari destination worldwide. Experiencing this beauty with a self-drive safari through Etosha National Park is a very exciting experience and should therefore be on any Namibia visitor’s itinerary.
As with many things, good planning is key! When to go? Where to stay? How to increase your chances of wildlife sightings? This Travel Guide has you covered! In this post, I will provide you with useful information on planning your trip, 20 important Do’s & Don’ts, and some itinerary suggestions to make the most of your self-drive safari in Etosha National Park.
Some Facts
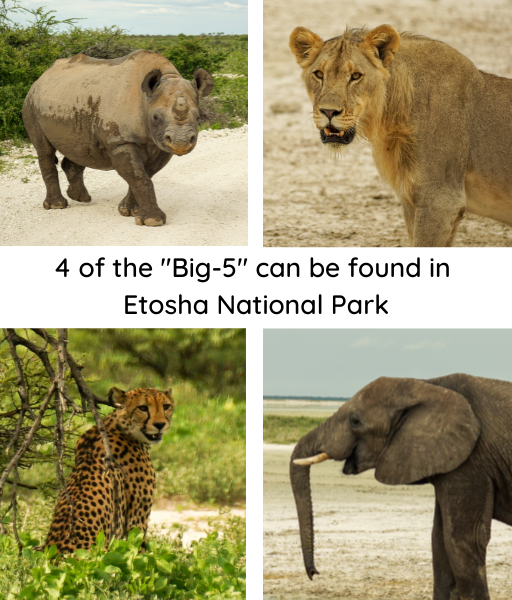
Etosha National Park spans an area of nearly 23,000 km2 and is one of the oldest conservancies on the African continent. It is named after the 4700 km2 Etosha Pan located in the park, which can be seen from space. Furthermore it boasts four of the “Big-5” animals (Lions, Cheetah/Leopard, Elephants & Rhinos), the largest population of the endangered black rhino as well as 114 species of mammals and 340 bird species.
Etosha was first “discovered” in 1851 when European explorers (Charles Andersson and Francis Galton) visited the area with Ovambo traders. The next 30 years were marked by sporadic settlements, occasional clashes between settlers and indigenous populations, and decreasing wildlife populations a the hands of big game hunters.
In 1896 German troops occupied the area and built a first Fort: Fort Namutoni. With the ongoing German occupation of “German Southwest Africa” (today’s Namibia) the Governor Dr. von Lindquist declared the area a Game Reserve in 1907. Initially spanning a staggering 100,000 km2 the park over the years reduced its territory to about just over 20,000 km2 by the 70s.
During the 70s and 80s, as a result of droughts and armed conflicts in the area, wildlife numbers greatly suffered. Since then, thanks to numerous conservation projects much of the wildlife has been restored and is now protected within park boundaries, restoring it to its glory and status as one of the best places for safaris in Africa.

Logistics for your self-drive safari in Etosha National Park
Where is Etosha National Park and how to get there?
Etosha National Park is located in the North of Namibia in the Oshikoto and Oshana Districts. The closest larger cities are Outjo, Tsumeb & Ondangwa.
There are several ways to get to Etosha. From Windhoek take the B1 highway north. It is one of the few tarred roads in the country so it is an easy (although long) drive. Take a rest stop in Otjiwarongo (and have some food & coffee at Kari’s Coffee & Restaurant). From there you can either drive towards Okaukuejo (188 km) or Namutoni (291 km). In total, you will need to plan around 4-6 hours of driving time.
Make sure you top up your fuel whenever you can – not all the gas stations inside Etosha have fuel at all times.
Coming from the Coast or Damaraland you will pass Outjo via C35 and/or C39 and then head up the C38 towards Okaukuejo.
From the north, when arriving from Caprivi Strip, Angola, or the Epupa Falls you take Highway B1 and turn off onto King Nehale Gate Road after Omuthiya.
For a couple of years, you can also enter Etosha on the Western side. Here you will need to take the C35 via Kamanjab when coming from Khorixas, or additionally C40 from Palmweg.

Gates & opening times
There are four main Gates through which you can enter Etosha National Park:
- Anderson Gate (Main Gate): located at the southern end of the park, it can be reached by driving the C38 via Outjo. This gate leads directly to Okaukuejo Camp.
- von Lindquist Gate (Main Gate): this is the main gate facing to the east and connects the Park to highway B1. The nearest larger town is Tsumeb and is the best option for making your way back to Windhoek.
- King Nehale Gate: this gate marks the northern entrance to the park and is 48km from the main road B1 leading to Ondangwa. This gate is popular when travelling down from northern Namibia (e.g. Epupa Falls) or the Caprivi Strip.
- Galton Gate: Galton marks the southwestern end of the park and was previously only accessible to visitors staying at Dolomite Camp. In recent years, this gate has been opened to the public and marks a very different landscape and access to the western part of Etosha – home to the Hartmann’s Mountain Zebra among others.
All four gates’ opening times are tied to the day’s sunrise and sunset time. These change weekly and can be checked at the camps or online on the NWR website here.
Driving in Etosha National Park
In theory, Etosha National Park is accessible to all vehicles, including 2 wheel-drive (2×2). Most main roads are gravel, but fairly straight and not too bumpy. As there is also a speed limit of 60 km/h, so you will be fine with a 2WD in many parts of the park.
However, that being said, we visited Etosha in the rainy season and we were very happy we had a 4WD (4×4). Many of the smaller roads branching off the main road were very bumpy and had several large potholes filled with water. In some parts, the road had been completely washed away. Also in some spots, there were large puddles covering the entire road, where you weren’t completely sure how deep it was. I would not have been comfortable in these situations with a 2×2.
Therefore: for more flexibility and peace of mind, I highly recommend going with a 4×4 (as in all of Namibia, when planning your road trip there). For more information on driving in Namibia in general, check out my post here.

Planning your Self-Drive Safari in Etosha National Park: 20 Do’s & Don’ts
1. How many days do you need in Etosha National Park?
A self-drive safari in Etosha National Park is a very rewarding experience. You will have lots of impressions, do a lot of slow driving, and be straining your eyes all day to see animals hiding in the landscape.
In order to really get the most out of your trip, I recommend at least 4 days and 3 nights. This gives you enough chance to get into the flow, have enough sightings and catch some game viewing that you missed on the previous day.
If you want to see the entire park from west to east I recommend at least 5-6 days.
If you are really pressed on time but don’t want to miss out on Etosha during your Namibia tip, try at least 2 days: start in Okaukuejo, stay one night inside the park (e.g. Halali Camp), and then exit upon sunset the next day at Namutoni. But trust me: any extra day spent in Etosha will not be regretted.
Keep in mind: Distances inside Etosha are long and you want to be able to take your time and take enough time at the waterholes and not be pressured to get to your accommodation on time or head out of the park before the gates close.
2. Best time to visit Etosha National Park
There are two factors to consider when decided on the best time to visit Etosha National Park for your self-drive safari: the season and the pricing.
Etosha National Park has two seasons: wet and dry. The dry season runs roughly from May to October, while the wet season is from November to April. During the dry season, resources in the park are scarce, the grass is dry and low and animals crowd around waterholes. This makes game viewing very easy.
This was not the case in the wet season when Etosha National Park fills with lush, green vegetation and rains provide animals with many water sources scattered throughout the park. This makes sightings more challenging (but not impossible!). You just need more patience and need to look more closely between bushes, shrubs, and trees.
Moreover, during the wet season, many migratory bird species can be found in the park as they head down to southern Africa during the European winter. And many animals can be seen with babies, which was a huge upside!

Besides seasons, pricing is another important point to consider. As the dry season is also high season, accommodations fill up very quickly and prices soar by about 30%-50%. Furthermore, this time corresponds with European, American, and South African school holidays, so Etosha National Park will be busy and you may have a line of cars crowding at one sighting.
When doing our research, most travel blogs had recommended visiting during the wet season. However, after careful consideration we did our 4-day self-drive safari in the wet season (January) and did not regret it: prices were very reasonable, the NWR-camps in the park were almost empty, the landscape was beautiful and green and we had really fantastic sightings. It was a little more tricky, but if you look closely you can see a lot of animals.
3. Waterholes
Etosha National Park features a plethora of waterholes – both natural and man-made. Especially during the winter months (May – October), these present a great opportunity for all kinds of animal sightings. During these months it is very dry, so all kind of game gathers around the waterholes to drink.
The three main NWR camps in the park (Okaukuejo, Halali & Namutoni) all feature waterholes right by the camp which are flood-lit at night offering fantastic game viewing opportunities. This is another big plus of staying inside the park.
When visiting during the summer months (November – May), waterholes could be a disappointment. With the seasonal rains, the animals are less dependent on waterholes for water and therefore scatter throughout the park. When we visited in January, almost every waterhole was completely empty. It makes game-viewing a little more challenging, but you can still have many awesome game sightings – you may just need to look a little harder.
4. Best time for animal-spotting: “Golden Hour”
The best times of day to spot animals on your safari are in the early morning at sunrise and in the late afternoon around sunset.
At sunrise the temperatures are still cool, animals are active and you have a chance to see animals such as lions, leopards, and cheetahs with their prey, after their nights’ hunting.
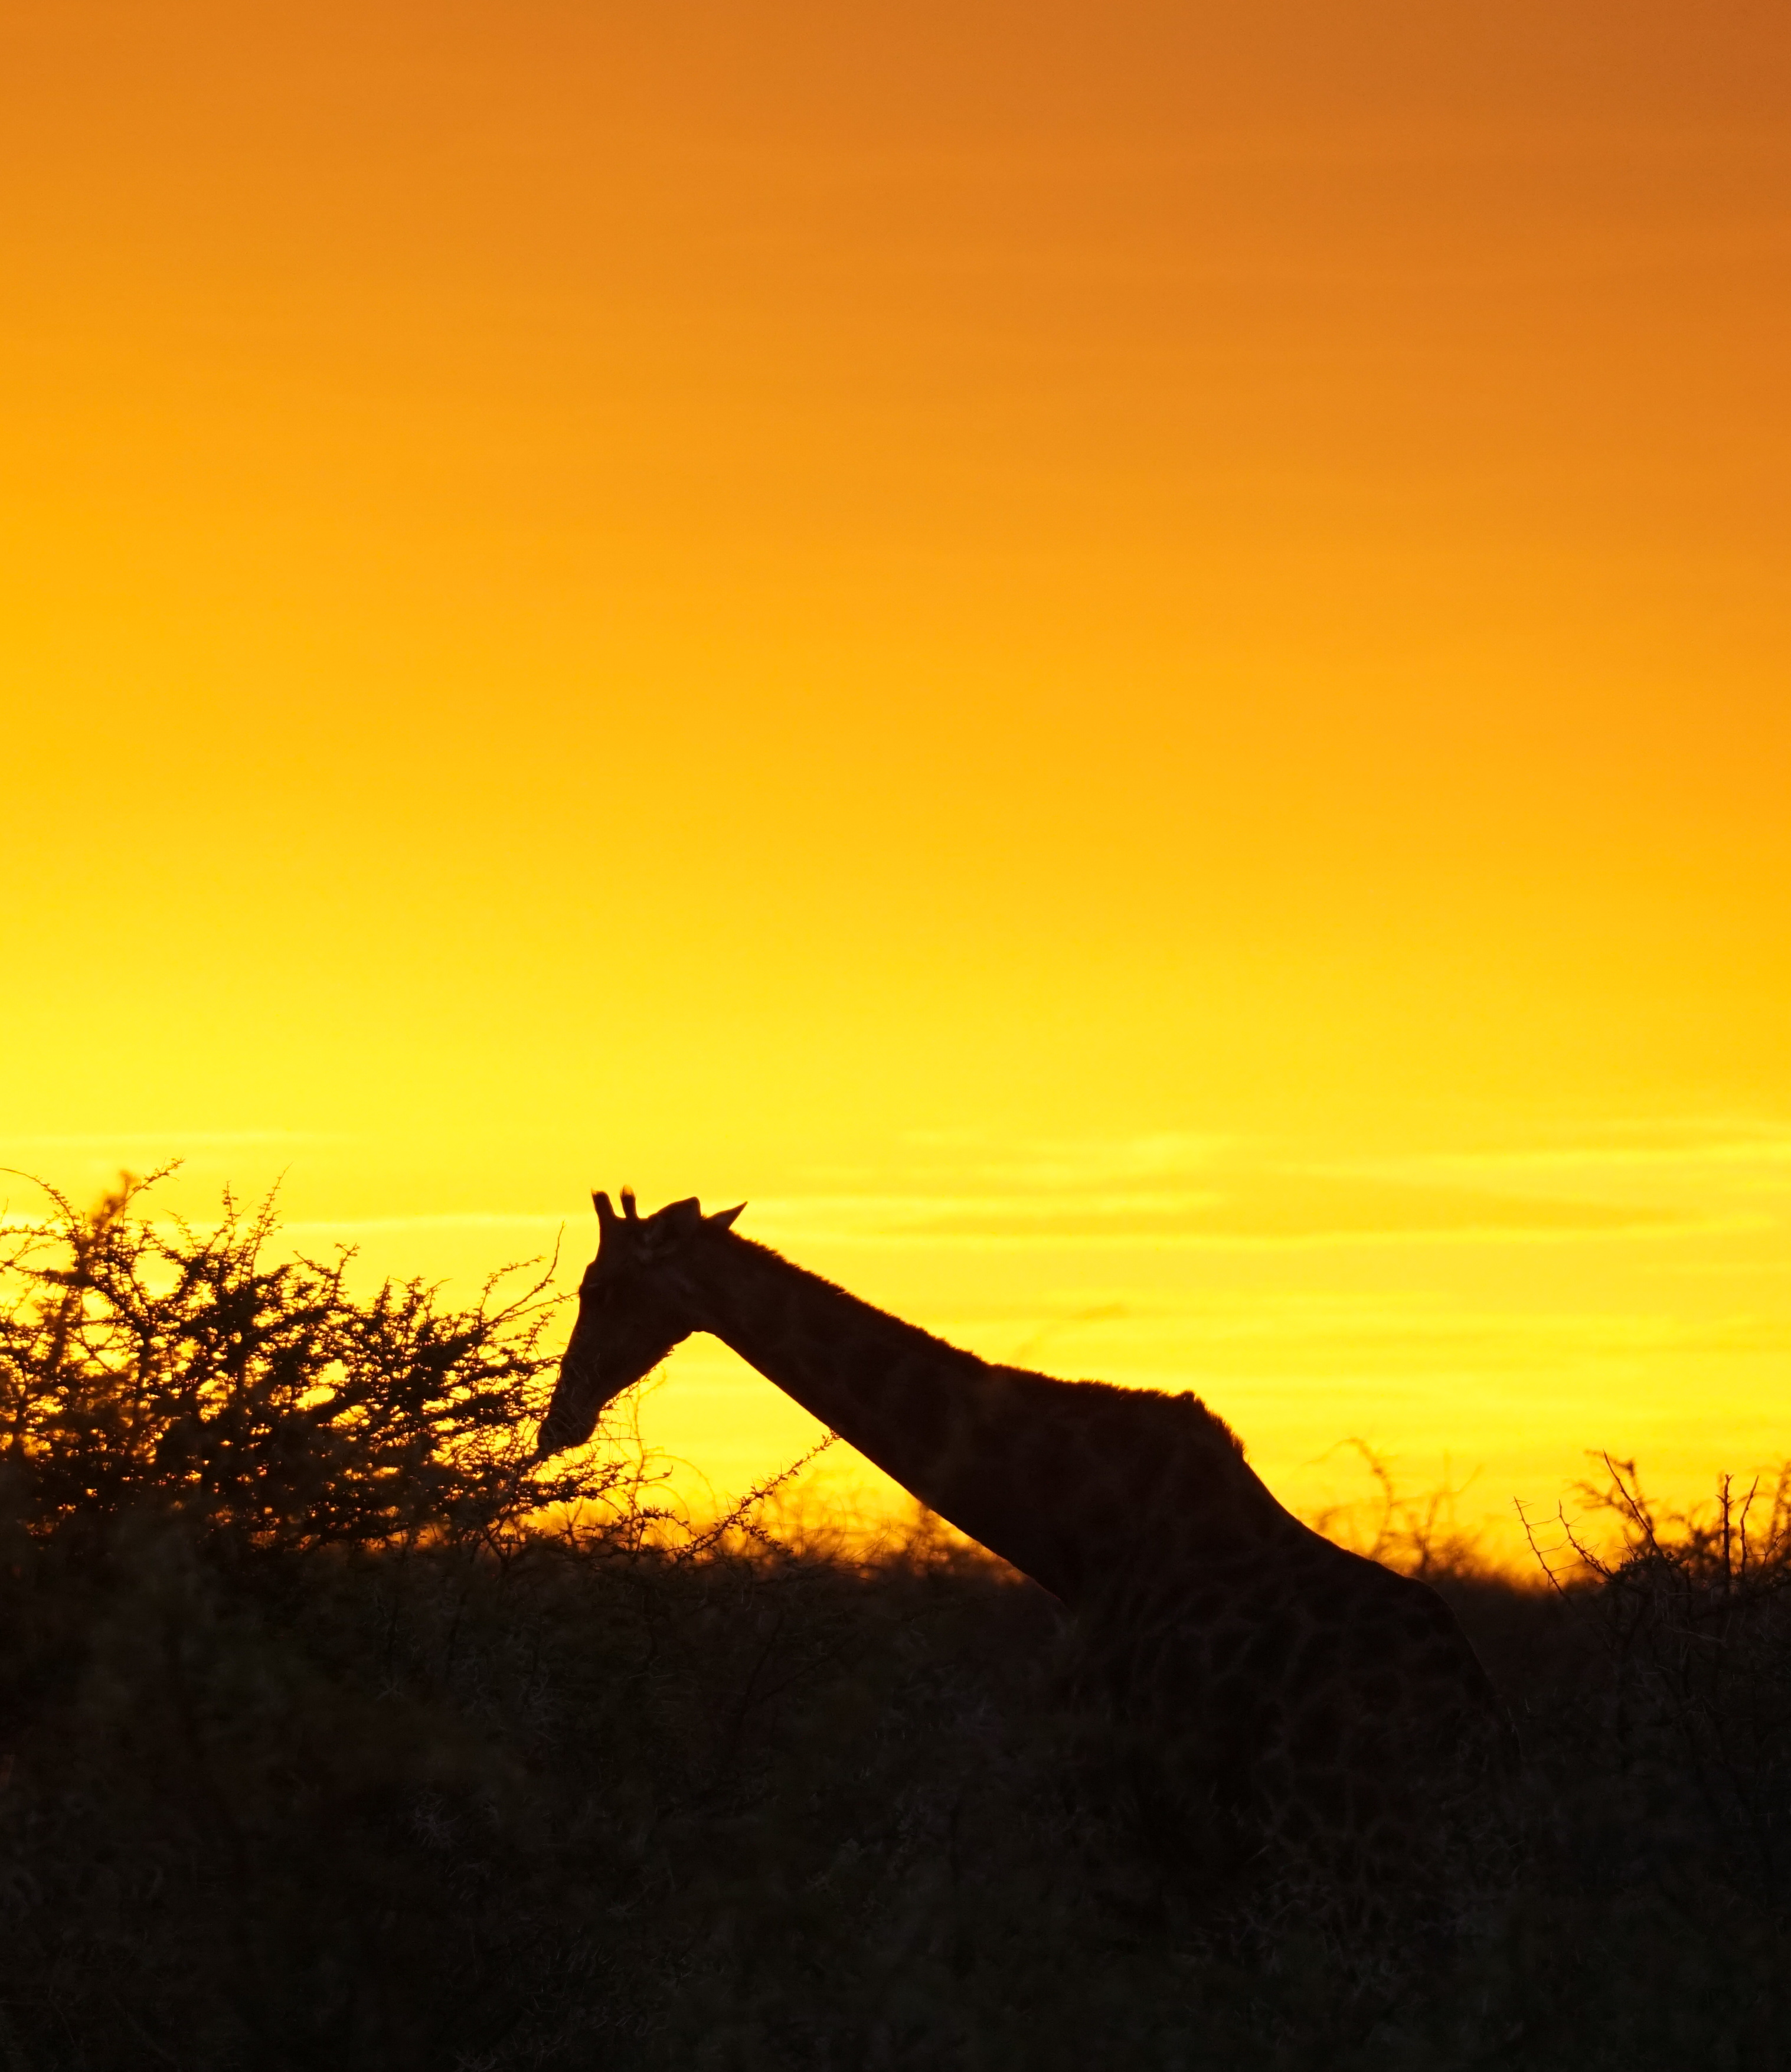
In the late afternoon sun, the shadows become longer, the light becomes golden and many animals are out again after the hot afternoon hours. You have especially good chances of catching animals around waterholes, see herds just strolling through the landscape and have everything soaked in a warm, golden light.

5. Etosha National Park Accommodation – Inside or outside the gates?
Inside the Park
I highly recommend staying inside the gates (e.g. Okaukuejo Camp, Halali Camp & Namutoni Camp) – as this gives you the chance to stay out until sunset & start the mornings directly in the park with sunrise when animals are the most active. All camps are run by NWR (Namibia Wildlife Resorts) so they have one central reservation office. You can book directly on the website.
In all 3 camps, you have a choice of staying at the Lodge or Camping. All camps have a restaurant, little shop, central reception, and a pool. More importantly, all three camps have their own waterhole, which is floodlit at night. Especially during the dry season, this provides for some exceptional game-viewing right outside your doorstep – both in the day and at night.
There are three main camps in Etosha National Park:
- Okaukuejo
- Halali
- Namutoni
Situated deeper in the park are three more camps (some only recently opened) which are more exclusive or consist of only a campsite:
- Dolomite Camp
- Onkoshi Camp
- Olifantsrus Camp
Insider tip: at all camps, you will need to leave a deposit of 500N$ upon check-in. As the card machines don’t work sometimes, make sure to have this amount on you in cash, just in case.
Overall, the main reason to stay inside the park in an NWR-camp is to maximize your time: you get to be in the park all day – from sunrise to sunset, you have access to the camp’s own waterholes at all times of day and can focus your complete attention on game-viewing, rather than worrying about making it to the gate on time.
That being said, the NWR-camps sell out very quickly, so make sure you book well in advance. Also the camps aren’t very luxurious in terms of facilities, service and accommodation itself, which still being relatively high-priced if staying at a chalet. If you are looking for something a little more luxurious or generally a better value for money, staying outside the park may be a better option for you.

Outside the park
There are plenty of accommodation options outside of the gates of Etosha National Park, catering to every budget: from luxurious lodges to B&Bs or Guesthouses to Campsites. Generally speaking: outside of the park, you will get a better value for money, better service, more amenities, and more varied food & drink options.
Accommodation to the South (near Andersson Gate & Okaukuejo Camp):
- Epacha Game Lodge
- Etosha Safari Lodge
- Etosha Village
- Ongava Collection
- Toshari Lodge
Accommodation to the East (near von Lindquist Gate & Namutoni Camp):
- Emanya Lodge
- Mokuti Etosha Lodge
- Mushara Collection
- Onguma Collection
For individual links to the lodges click here.
Some points to consider when staying outside of Etosha: you may sometimes need to wait in a queue in front of the gate to register your car and then head to a camp to pay your park fee. This costs you precious game-viewing time especially during the best viewing times of the day. Also, in the evening you need to plan enough time to get to the gates, so you will be on a little tighter schedule.

6. Buy a map
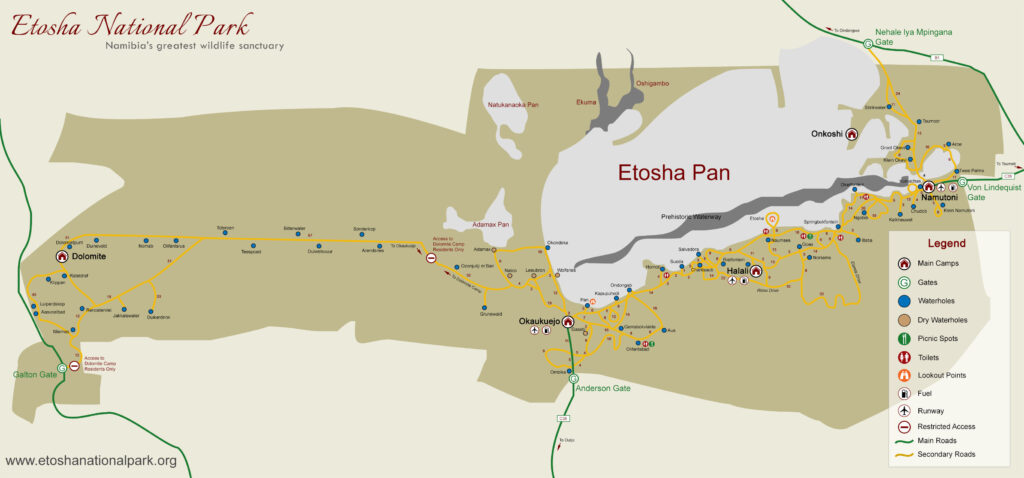
Upon arrival at the first camp – probably Okaukuejo or Namutoni – (to check-in and/or pay your park fee), buy a Map of Etosha National Park at the souvenir shop. It includes all roads, vegetation types and a complete list of all bird and mammal species you can view.
Doing a self-drive safari with this map made life easier when deciding where to go next and more fun while trying to identify the animals you just saw in the map booklet.
7. Check the Sightings Books at the Camp receptions
At the reception of the 3 camps, you will find a book with Game Sightings – you can check it out to see where certain animals have been spotted the past days, to get some inspiration of where to drive. Unfortunately, when we were there, the books were not very up-to-date at most camps.
When making notes yourself, make sure you do not include Rhino or Elephant sightings, as these are often misused by poachers (there were no recent cases, but just as a safety measure).

8. Speak to Guides for some advice on current animal sightings
More reliable information on current days’ sightings can be obtained by speaking to safari guides at the camps. These are usually parked upfront by the reception. You can ask them if they had any sightings during the day and they may be able to give you some useful advice where you can get the best viewings.
When we visited during wet season for example, a guide gave us a very useful hint that during these months elephants usually migrate North towards Andoni, as the ground in the south gets too muddy for them. And bingo: we actually changed our itinerary for the next day and saw some elephants up north!
9. Best spots for game viewing: my recommendation
Waterholes: in the Namibian wet season (October through May) chances are that the waterholes will leave you disappointed. At every waterhole we were there was almost no animal. This is because the animals are much more scattered throughout the park around, so you will have better chances else place.
Lions: lions may be a little hard to spot, especially as they like to lay beneath trees in the shade during the day. We had a few very lucky moments where lions crossed the road only a few meters in front of our car. The best sightings we had were near Leeubron Waterhole, between Okaukuejo Camp and Nebrowni waterhole just after sunrise, between Ondongab & Homob Waterhole, and up north of Namutoni between Tsumcor and Stinkwater Waterhole.

Cheetahs: near Namutoni between King Nehale Waterhole and Twee Palms.
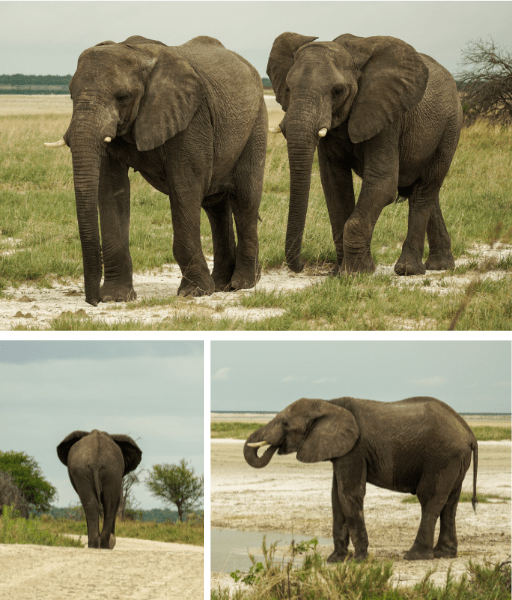
Elephants: in the wet season you will have good chances of seeing elephants up north of Tsumcor Waterhole around Stinkwater and Andoni Plain.
Black- and White Rhinos: most of the rhinos we saw were around Halali camp and Namutoni Camp en route to Fischer’s Pan (Twee Palms).
Damara Dikdik: unsurprisingly we saw Damara Dik-Diks on Dikdik Drive (Bloubokdraai) south of Namutoni camp. This was also home to a Hyena family with several new-borns!
Overall during our 4-day self-drive safari in Etosha National Park I would say following were our highlights:
- Fischer’s Pan: numerous bird species, Cheetah, Rhinos, Hyena, etc.
- Stinkwater: on the edge of the pan we saw about 10 lions, Kudu, Elephants, etc.
- Namutoni: the whole area was really worthwhile. The Kind Nehale Waterhole, Groot Okevi and Klein Okevi, etc.
- Dikdik Drive: for Damara dikdiks, Hyenas, many birds etc.
- Just outside Halali Gate: several rhino sightings
- Etosha Lookout: fantastic view onto the great, wide flat for a great impression of the landscape. Also, we saw a lone elephant off in the distance on the pan’s edge
10. Do you need to worry about Malaria?
In short: No. We visited Etosha National Park for a self-drive safari in January 2021 (wet season) and can say that we had no problems. Before our trip, we carefully checked the main website of the park but found that Etosha National Park has a very low risk of malaria all year round, although in the wet season it is slightly higher than in dry season. The winter months (May to October) are entirely malaria-free.
If you want to be completely on the safe side, consult your doctor for advice if malaria prophylaxis is necessary.
That being said, be careful anyway! Bring along insect repellent if you are sitting outside in the evening and wear long, airy trousers when outside after dark, in order to minimize risk.
Check out the official NWR site from more infos here.
11. Take your time & be patient!
The most beautiful thing about safaris is that you are out and connecting with nature: the wide expanses of the savanna, free-roaming animals, and trying to get a glimpse into “the wild”.
Although it sounds very intuitive, it’s important to keep in mind that this means that sightings not guaranteed. The animals are free to roam around and you don’t have absolute certainty like you would in a zoo. This is simultaneously the beauty of it, but can also be frustrating sometimes if you have longer intervals of seeing nothing.
That being said, take your time! Be patient, drive slowly (max 30-40 km/h) and take your time. Look under trees & behind bushes, check out water holes, drive around and enjoy the “treasure hunt”. That’s all part of the experience. If you take your time, you will definitely be rewarded with sightings when you least expect it.

12. Don’t only scout for the “highlights”
Etosha is home to four of the Big-5: lions, cheetah/leopards, elephants and rhinos. These are all very impressive; however: one very warm piece of advice – don’t only chase these “highlights”.
What makes Etosha so beautiful and special is its’ landscape and the large variety of mammal and bird species that abound in the park. We saw some of the most beautiful birds, witnessed a hyena family playing with its young, saw small cape foxes peeking out behind bushes, and soaked in the endlessness of the salt pan at Etosha Lookout. It’s all these other things that made our visit so special.
Unfortunately, we met some cars in the park (one exchanges information on cool sightings en-route) who did not care about any of the other sightings and literally said “we don’t care about X, we just came to see some lions”.
13. Adjust your route depending on the seasons
During the rainy season, elephants often migrate to the northern parts of Etosha, as the ground gets too muddy for them in the south. This means your chances of seeing an elephant will be higher if heading north of Namutoni towards Andoni. Therefore, make sure to speak to guides at the camps and ask if there are any seasonal changes to take into consideration when planning your drive.

14. Come prepared for your drive – Bring sunscreen, food & water
I cannot stress enough how important these three points are. Days are long, it can get tiring to peer into the landscape looking for animals and it gets very hot during the day.
- Bring sunscreen! You can get a sunburn through your car windows if you are sitting in the car all day.
- Have snacks in the car. After leaving camp after breakfast, depending on how the day goes, you could be back only in the evening for dinner. Make sure to take along cookies, crackers, and fruit (e.g. Bananas or Apples) to keep moods up throughout the day. (Just don’t bring citrus fruit – elephants can have a severe reaction to these and smell them from miles away).
- Last but not least: bring enough water! Have at least 2-3 liters per person per day. It is very hot during the day and animal spotting days can get long. So you will want to keep yourself hydrated to make sure you enjoy the safari as much as possible.
15. Bring the right photography equipment
This is an important point: to get the most of your safari experience and capture your moments into beautiful memories, I highly recommend bringing a tele-zoom lens. This enables you to zoom in close enough to actually see the animals close-up. Aim for anything above 250mm ideally. The more the better.
I have a Sony Alpha6000 camera and can highly recommend the Sony SEL-70350G Tele-Zoom Lens (70-350 mm, F4.5-6.3, OSS, APS-C). I got great results and was able to get super up-close and really see the animals.

16. Get Binoculars
This was a real game-changer during our safari. While it is possible to spot animals with the naked eye at a large distance, it is quite tiring and chances are you will miss some great opportunities. Binoculars give you the possibility to double-check if you are unsure if there could be an animal hiding beneath a tree or behind bushes.
When deciding which binoculars to get, there are many factors to consider (I could probably write a whole post just about that). For some initial direction, the most important things to look at are the following:
- Magnification (e.g. 7X, 8X, 10X, 12X etc.)
- Objective Lens Diameter: the size of the lens, determining how much light is picked up by the binoculars. In lower light conditions, the higher the number the better. BUT: Keep in mind, a ratio of 5 or below to magnification is ideal – otherwise, you will have a quality loss especially during dusk or dawn in lower lighting conditions (e.g. 8X42, 10X50, etc.)
- Lens coating: high-quality coating reduces the amount of light reflected and instead enters the binoculars, giving you crisp and sharp images with bright color
- Field of view (the visible area through your binoculars): the larger the degree, the larger the area that you see.
- As binoculars are mainly used outdoors, some form of waterproofing is probably a good idea
As I was deciding which binoculars to get I was shifting between 10×42 and 8×42. In the end, we opted for the Celestron 71406 TrailSeeker 10 x 42. We were very happy with this choice and had great results during our safari, making our wildlife-watching experience so much better.

17. Bring a Flashlight
When camping, this point is absolutely essential; but even when staying at a Chalet the path to the waterholes at night is quite dark (e.g. Halali) and therefore I recommend getting a flashlight not to stumble on your way.
18. Go on at least one guided Sundowner / Night Drive
We are huge fans of self-drive safaris as these give you 100% freedom and flexibility to go at your own pace and take your time. However, I do recommend going on a guided Night/Sundowner Drive on one day, as this will give you the opportunity to enter the park after sunset (which you cannot do on your own) and is also a way to learn a little more about the animals from an experienced guide. Perhaps you can also get one or two pieces of advice for your own self-guided drives the next day.
19. Don’t get too close to the animals
Leave all animals enough space – especially rhinos and elephants. If an animal’s body language shows that they are not comfortable (ear flapping, stamping, mock charging, etc.), stop your car, shut down the engine, or retreat slowly. There have been cases in the past of cars being attacked which can be dangerous to both you and the animal. So just respect the animals’ personal space, and everything will be fine.
20.Visit Etosha at the end of your Namibia trip, not the beginning
The last piece of advice of the 20 Do’s and Don’ts is: make Etosha National Park the glorious ending of your trip. Our self-drive safari in Etosha National Park was such a highlight, so have your vacation slowly build up to it.
While travelling throughout Namibia we saw various animals in different parts of the country and were very excited every time. If you visit Etosha National Park first thing, you will be very spoilt and therefore not be excited about any animal sightings after, as it just won’t match up.
My recommended Itinerary for a 4-day/3-night self-drive safari in Etosha National Park

Now that you are all set to begin your self-drive safari to Etosha National Park, you just need to plan your itinerary. Below is my recommendation on how to make the most of your time, based on our experience.
One remark on our itinerary: as we were travelling in wet season (Namibian summer) we had to do more more driving around, as we could not rely to see animals at the waterholes. If you are travelling during the dry season, you may want to switch up the route and put more focus on spending time at waterholes as your sightings there will be plenty.
Day 1
Plan to arrive at Andersson’s Gate around 2 pm. Register at the gate and make your way up to Okaukuejo Camp. Check in at reception and pay your park fee. Get your key to your room/campsite and drop your luggage in your room. Buy a map of Etosha National Park and make sure you are equipped with enough water and food/snacks in your car.
Around 3:30 pm head out for an afternoon drive up to Okondeka, via Woflsnes. Next, check out Leeubron and then slowly make your way back to Okaukuejo in the warm late evening sun.
Have dinner and then head over to the Okaukuejo Waterhole and watch the sunset and animals gathering to drink.
Day 2
Head out early the next day, check out, read the sightings book at reception and make your way towards Nebrowni waterhole. With some luck, you may have a chance to see some predators with their kill. After Kapupuhedi, head south to Gemsbokvlakte, Olifantsbad and via Aus back to Ondongab. Next either take the north route via Rietfontein to Halali Camp or drive south on the Rhino Drive.
Arrive at camp around 4:30 pm, check-in at Halali reception, and have dinner. Go on a sundowner/night drive starting around 6:30 / 7 pm. In the evening check out Moringa Waterhole in Halali camp. Chances are you may see some Leopard, Cheetahs, or Rhino drinking.
Day 3
Start your day early and head out shortly after sunrise. Make your way to Etosha Lookout and enjoy the endless vistas over the salt pan. Take a route of your choice heading towards Namutoni Camp. Depending on what time you arrive, check-in at Namutoni Restcamp (the chalets are very nice!) and head right back out. Make sure you drive around Fischer’s Pan in the late afternoon sun for some fantastic bird sightings and very good chances to spot some Cheetahs, Rhino, etc. (we had most sightings in the late afternoon between Namutoni, Twee Palms, and Klein Okevi).
Day 4
Start your day early with sunrise and first off head down to Dikdik Drive (Bloubokdraai). In the early hours, we saw a whole Hyena family with its pups as well as some Damara Dikdiks. Next, check out Chudop and then head north of Namutoni towards Stinkwater and Andoni. As previously mentioned, elephants migrate north in the wet season, with the ground being too muddy down south.

On this last day, you may need to leave the park by 3 pm (depending on how many days you paid for) and head out either north through King Nehale Gate (towards Epupa Falls, Angola, Caprivi, etc.) or if you have enough time back out through Von Lindquist Gate towards Tsumeb, etc.
Of course, depending on where you are arriving from, you can do this route backward (starting in Namutoni and ending in Okaukuejo) or if you have some extra days, take some time in the Western part of the park for a chance to see some Hartmann’s mountain zebras (they only live in higher elevations). There you can opt to stay in Dolomite Camp and/or Olifantsrus Camping.
Wondering what else to do during your visit to Namibia?
For more inspiration check out the 40 Best Things to do in Namibia here.
Planning to visit Namibia’s #2 tourist attraction Sossusvlei? Make sure you read my Travel Guide on visiting Sossusvlei and Deadvlei here.
Are you planning a road trip to Namibia and not sure yet what the best route for you is? Check out my Ultimate 3-week Road trip Itinerary here and make sure to read my planning Guide including 50 essential planning tips on Driving, Sleeping, and surviving in Namibia. 🙂

You May Also Like
Namibia Travel Guide: 50 Essential Planning Tips
March 3, 2021
Visiting Sossusvlei & Deadvlei in Namibia: the Ultimate Travel Guide
April 5, 2021